Claire is modeling for me today. She is wearing a scarf that I crocheted and every time that I have worn it I have received compliments on it. So I decided to share what is very quick to make if you know how.
If you don't know how and are trying to make it without a pattern (no patterns seem to be my pattern) then it might take you an entire night of crocheting and pulling out. The second night, however, your scarf will grow quickly.
Let me save you some time so that you can do this in one evening instead of two.
If you have never crocheted but have wanted to learn, YouTube has some great videos that demonstrate the basics and this pattern is super simple to start with. If you live in Perth we can trade services. I need a housekeeper.
I used a H/8 or 5.00mm needle and worsted weight %100 cotton yarn.
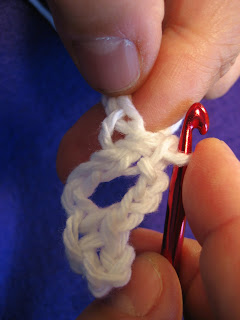
1. Chain to your desired width as long as you have multiples of four, 8, 12,16, 20, 24, etc plus 2. The rest of the pictures are done on a chain of 24.
2. Single crochet in 3rd chain from hook.
3. Chain 3


4. Single crochet in 4th chain from the last single crochet.
5. Continue steps 3 and 4 until you get to the end of the chain.
6. At the end of the row, after the last single crochet, chain 2.
7. Turn
8. Single crochet in the hole made by the chain 3.
9. Chain 3.
10. Single crochet in the hole of the next chain 3 on the bottom row.
Lather, rinse, repeat.
Just remember that at the end of the row only chain 2 before the turn. It leaves 1/2 sized holes on the end for the net/staggered look.
This pattern has not been tested and if anyone is brave enough to attempt it and finds an error, please let me know so that I may correct it.


Ok... now you are just showing off you craftiness! ;-) Love ya!
ReplyDeleteWendy
I think I will just commission you to make one for me. Red is nice. xo
ReplyDeleteO.K. then, I think I will stick to this...
ReplyDeleteGetting the pistons into the cylinders with the proper orientation was about the only stumble I had. The pistons are marked "Front" or "Rear" with an arrow that needs to point to the front of the engine. After I got the rear piston/cylinder mounted to the connecting rod I looked into the cylinder and noticed I had mounted the arrow pointing rearward instead of forward! When transferring the assembly to the engine, I hadn't taken into effect of working backward on the bench and then transferring the assembly to the bike.
Please respond to me at Menanie77@cablespeed.com if you get a chance :-) Thanks again!
ReplyDeleteThis is beautiful! Thanks for sharing the pattern. I am making one for a special little girl in my life. I did the chain of 24 but it seems a little wide for a child. How much did you chain for the scarf your daughter is wearing? Thanks!
ReplyDeleteMelanie Pizzini
Looks great! I wish there was a video of the stitch. Is there?
ReplyDeleteThank you for sharing ... I have 3 beautiful granddaughters who all love "accessories" I know this will look lovely on all of them in the color of their choice ;)
ReplyDeleteThis was just what I needed! I'm being a fish for Halloween!
ReplyDelete